Wiley Treatment Plan
How to add a treatment plan using one of our integrated Wiley Templates.
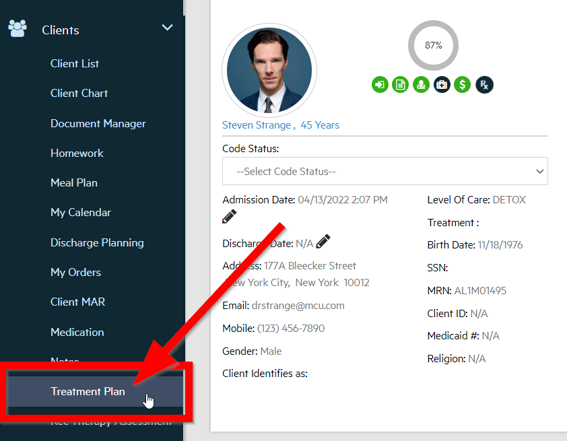
1. Go to the Client's profile by selecting the client from the dashboard widget,

OR 'Clients' in the navigational menu and then "Client List". Then select the specific client that is in need of a treatment plan by selecting their picture.

2. Once you have selected the specific client go to the "Treatment Plan" icon on the top right hand corner of their profile. Select the fifth icon as shown below.

Or select the "Treatment Plan" section under the Client tab of the left hand menu.

3. Once you are on the Client's Treatment Plan page select the, "+ Add Wiley TP" in the top right hand corner.

4. Select which Diagnosis you would like to create a treatment plan for by selecting the corresponding problem, and diagnosis code.

NOTE: After completing each step in the treatment plan, the next section will appear below based on the answers you previously entered.
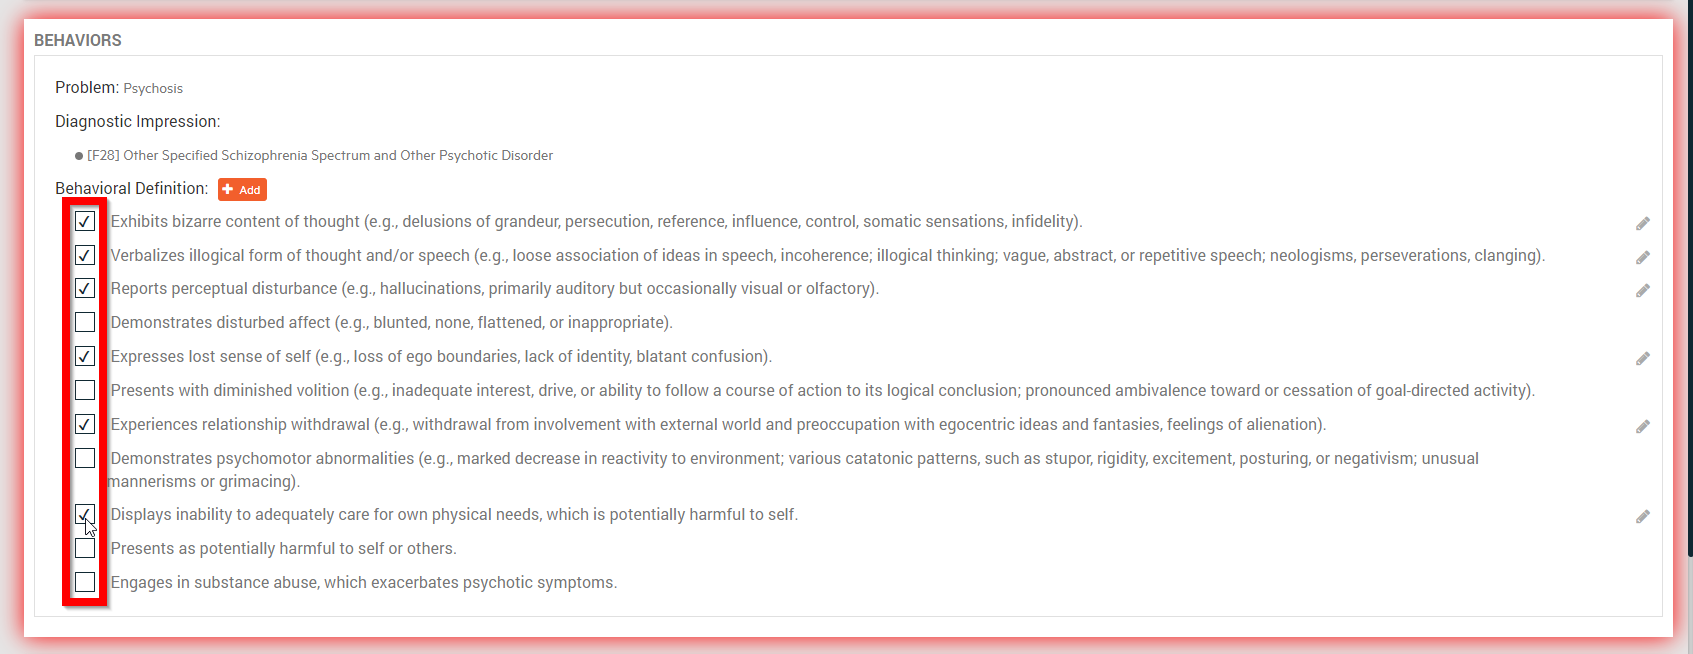
5. Select the appropriate definition for the Client's diagnosis by checking the box in front of the Wiley-provided definitions.

Alternatively, you can add a custom definition click on the orange "+ Add" button. A box will populate allowing you to type in the personalized definition into the box. To save you new definition select the 'save' icon on the right side of the populated box. Select the "X" if you would like to delete your custom definition.

You can also edit existing definitions by checking the box and then the 'pencil edit' icon on the right-hand side of the page that corresponds to the definition you want to change. Select the 'save' icon when you are finished. Select the "refresh" icon (the one with the arrows) if you would like to revert back to the original provided definition.

6. Select the goals that are appropriate for the client's treatment plan based upon their diagnosis and behavioral definition. Follow the above steps if you want to add a new custom goal or if you want to edit an existing goal.

7. Select specific 'Objectives' that correspond to the larger 'Goals' for the client. You must add at least one 'Objective' to each 'Goal' you've added in the previous section. Follow the above steps if you want to add a new custom 'Objective' or if you want to edit an existing 'Objective'.

The "ebt" blue icon next to some of the objectives means that this option has been marked as an "evidenced based treatment" by Wiley.
8. Select Interventions that corresponds to the 'Objective', 'Goals', and 'Diagnosis' of the client. Interventions are the services you and your team will provide to assist the client in achieving their objectives. You must add one 'Intervention' to each 'Objective' you've added in the previous section. Follow the above steps if you want to add a new custom 'Intervention' or if you want to edit an existing 'Intervention'.

9. You will now see an overview summary of everything you have entered. Select "Generate Treatment Plan".
...
10. To finalize the Treatment Plan, you will need the 'Start Date & End Date', client signature, and your signature. You can also assign reviewers (other staff to sign off on document) if needed.

11. At this time you can also 'Add Status' and 'Add Wiley Homework' by scrolling down to the 'Client Goals' section. "Status" is associated with each objective, and states whether it is completed, in progress, etc.

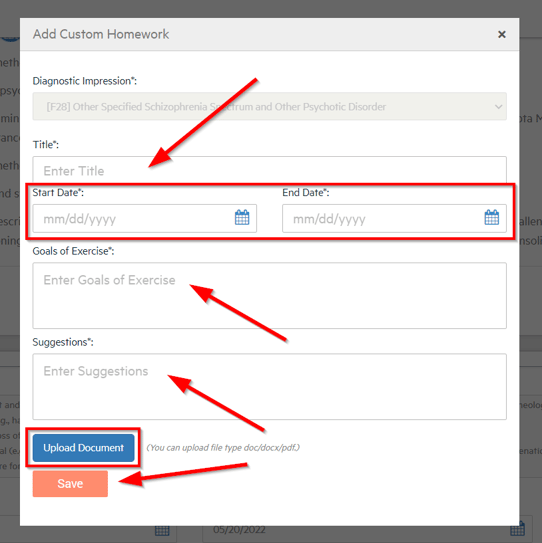
Select "+ Add Wiley Homework" or the "+ Add Custom Homework" to add worksheets to the client's chart based on their diagnostic impression. The homework will then be found under "Homework" on the left hand menu under their chart.

To add Custom Homework assignments select "+ Add Custom Homework" and fill in all the required information. You can upload documents as well by selecting "Upload Document".

11. Scroll to the bottom where you can select "Save". You can also select "Save TP with Template" if you would like to use this TP in the future for other clients (it can be edited on an individual basis for each client.) If you select this, you will be prompted to give the template a name. It will then be accessible in the treatment plan screen when you select "Add Office TP".

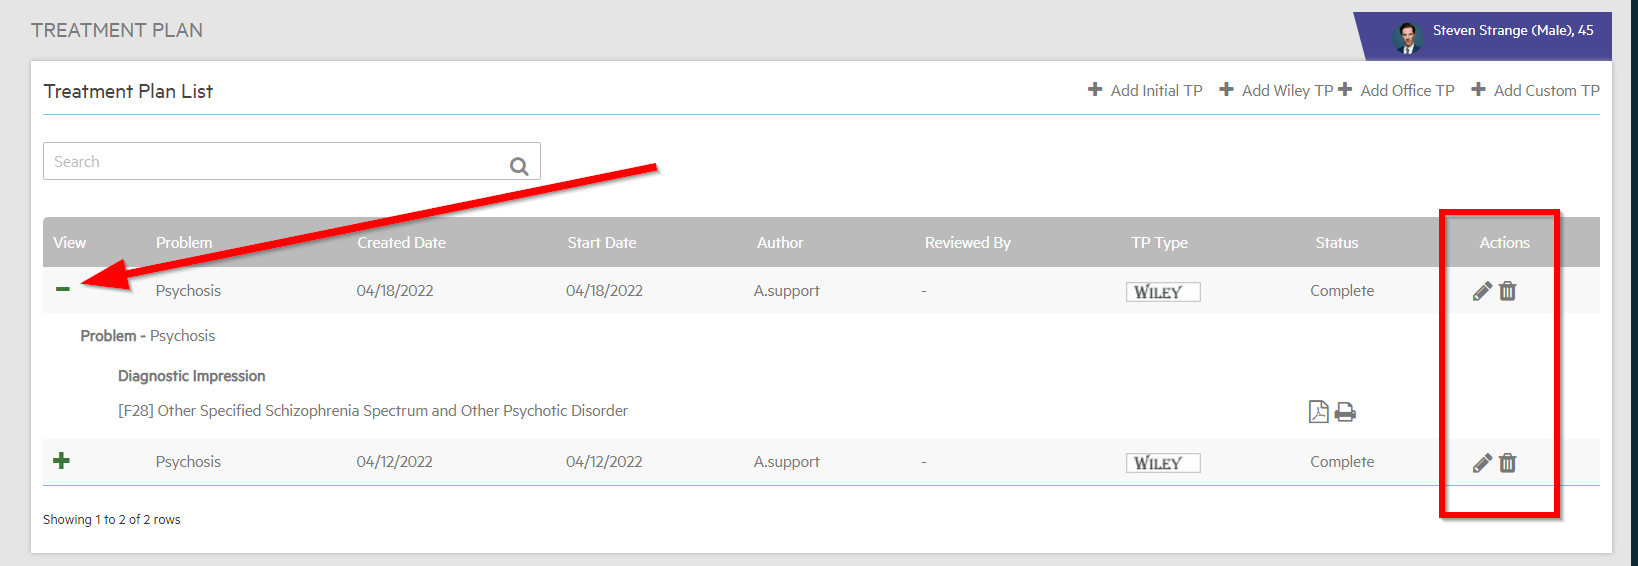
Done! Your treatment plan will be added to the "Treatment Plan List". You can come back and edit your treatment plan at any time. Just select the 'pencil' icon under the 'Actions' column. A new version will be created in this list, and both time-stamped versions will be accessible. To delete the treatment plan select the 'trashcan' icon under the 'Actions' column.

![Untitled design (2)-3.png]](https://support.helloalleva.com/hs-fs/hubfs/Untitled%20design%20(2)-3.png?height=50&name=Untitled%20design%20(2)-3.png)