-3.png?height=120&name=Untitled%20design%20(2)-3.png)
How to add insurance and authorizations to a client chart.
Adding insurance and authorization information in Alleva ensures that client billing and utilization tracking are accurate and up to date. This guide walks you through how to navigate to the correct sections of the client chart, input insurance details, verify coverage, and add authorizations.
Navigating to the Insurance Section
-
From the side navigation menu, click on the Client List tab and select the client whose insurance information you want to update.
-
Once in the client's chart, you can access the Insurance field in two locations:
-
Billing Intake
-
Client History section
Both sections are linked, so any updates made in one will automatically reflect in the other.
-
Adding Insurance Information:
-
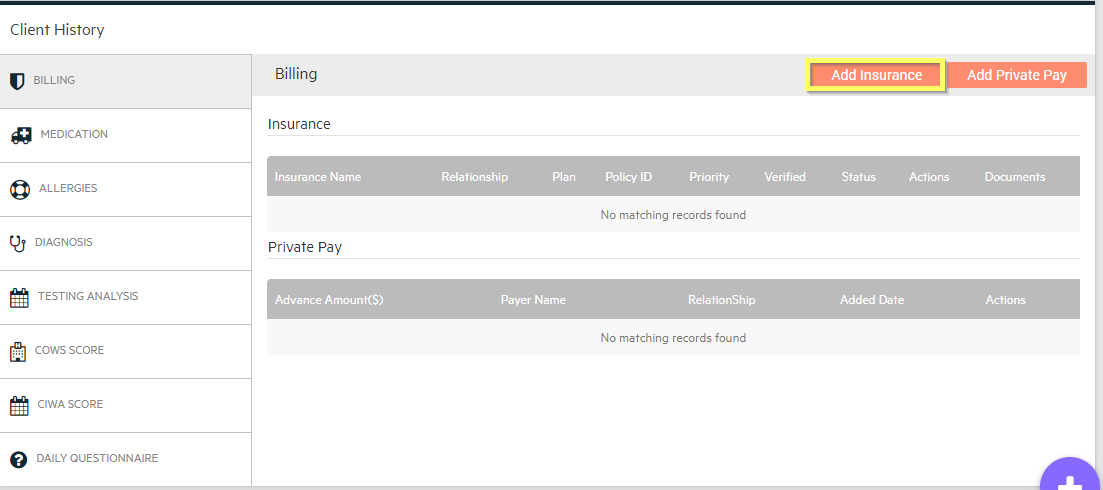
Click the Add Insurance button in the Billing tab at the bottom of the client chart.
-
In the Insurance Name field, begin typing the provider name. A dropdown will appear with pre-populated options. Select the appropriate insurance provider from the list.
If the provider is not listed, it can be added via System Settings > Billing.
-
In the Plan Type field, begin typing the plan name (PPO, HMO, etc.) and select from the dropdown.
-
Complete the remaining required fields and attach any relevant documentation.
-
Click Save to add the insurance to the client chart.
Tip: If a client's insurance includes carved out benefits, you can add this information when entering or editing their insurance. Simply check the "Carved Out Benefits" box and fill in the required fields for benefit type and provider details.
Adding a Verification Status:
-
After saving the insurance information, click the Insurance Verification button.

-
A prompt will appear requesting your signature. Once signed, the verification status will update from a red "X" to a green checkmark to show that it has been verified.
Adding an Authorization:
-
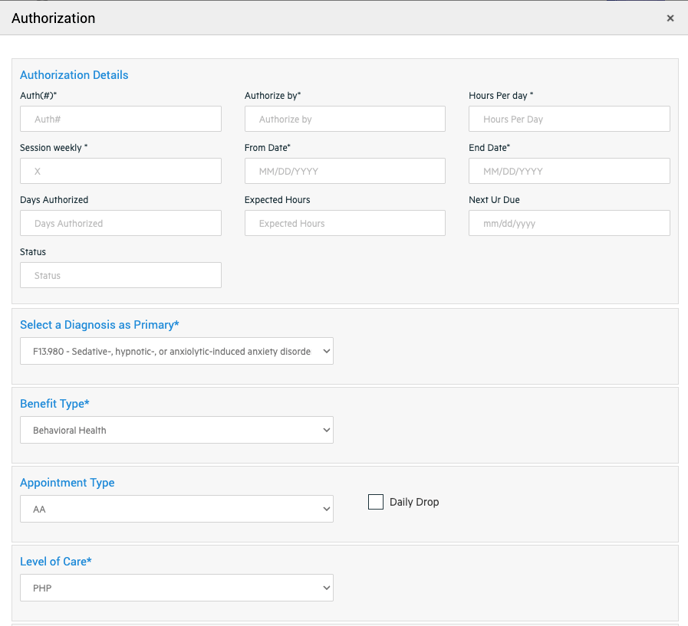
Click the Add Authorization button to open the authorizations page.

-
On the new page, click the orange Add Authorization button.
-
Complete the authorization form by entering all required information. This includes the primary diagnosis for this authorization (which may differ from the primary diagnosis listed in the client’s chart), the benefit type (Behavioral Health or Medical Health), and the applicable appointment types. You now have the option to select a specific appointment type that this authorization applies to, including individual and/or group sessions. Alternatively, if applicable, you may select the Daily Drop checkbox if this authorization is for a daily drop service rather than for completed sessions.
-
Click Save to add the authorization to the client chart.
Tracking Authorizations:
Once an authorization is added, it will appear in the Next UR Due field on your Alleva dashboard. This feature allows you to:
-
View upcoming expiring authorizations
-
Track overdue authorizations
-
Filter by date for better management and planning
